
Table of Contents
Bookmarking and Lists
While a limited filtering mechanism is available in all of the major data-entry dialogs, an extremely useful addition to this mechanism is in the form of bookmarks and lists. Both of these mechanisms provide direct access to a single or groups of records in a direct manner, without needing to select local filtering on each occasion.
Bookmarking
 The Bookmarking system allows the recording of individual items for display in the main menu under the [Bookmarks] menu item. Adding and replacing bookmarks is performed from within an individual record. Selecting any individual bookmark from the menu results in that record being loaded and displayed in the appropriate management dialog for editing.
The bookmarking system is particularly useful for the temporary bookmarking of a record that either needs more work, needs investigation, or otherwise has special interest for a period of time and it would be useful to have fast-access to the record rather than search on each occasion.
Lists
The Lists system is an expansion of the bookmarking system however, rather than record a single item, each list records the criteria for a general search. As it is the criteria that is stored rather than the record of an individual item(s), the records accessible via a List may therefore alter over a period of time.
The Lists system is particularly useful in the creation of virtual sub-collections of records that have meaning over longer periods of time. Accessing records via one of the lists ensures that the same nature of records is being accessed on each occasion without needing to filter the records manually on each occasion.
Lists are displayed beneath individual bookmarks on the [Bookmarks] menu item, but are created (and removed) within the Search dialog, not within individual records. Prepare and execute a search within the Search facility at least once (on until the correct combination of criteria is achieved) and then select the [Make into list] menu item from within the Search dialog.
Auto-Lists
(This facility is only available from v1.0.96)
 The Auto-List system is a way by which a set of sub-groups of readers and items can be accessed (as opposed to the entire Readership or Catalogue) in a simple manner - it essentially equals to the creation of lists without the need to calculate the correct criteria in the [Search] facility. Auto-lists are always public (i.e. they are available to anyone with managerial access, and not locked-down to individual users) and appear beneath the standard lists in the managerial [Bookmarks] menu option.
Auto-lists are generated by selecting the auto-list checkbox on any lookup group or lookup value in the Lookup Manager. Auto-lists can be created from Item Index, Item Popup & Config, Reader Index and Reader Popup & Config types of lookups. At this time, Qualifiers, System and other non-item or reader lookup types are not supported in the auto-List system.
Using Auto-List with a group
The fastest, but most 'blunt instrument' way of creating an auto-list is to enter the Lookup Manager and selecting one of the Item or Reader groups to display the group record. Do not click the arrow / plus to expand the box - we need to have the group itself selected. By selecting the group, the group record will be displayed on the right hand side of the screen.
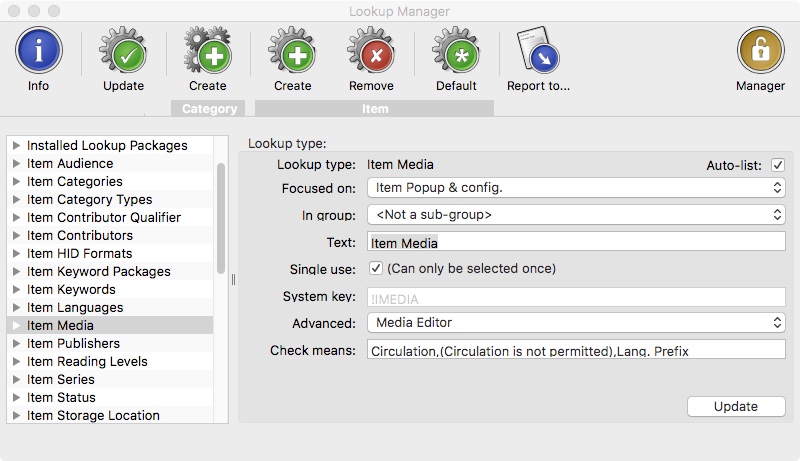 Click the [Auto-List] checkbox in the top right-hand of the record and then select [Update] to save the changes.
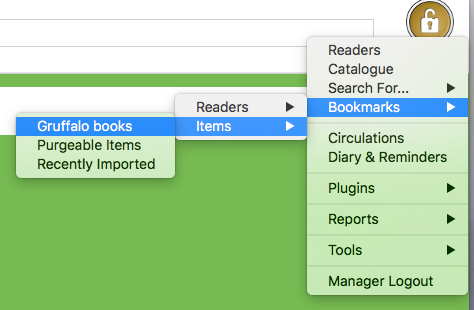
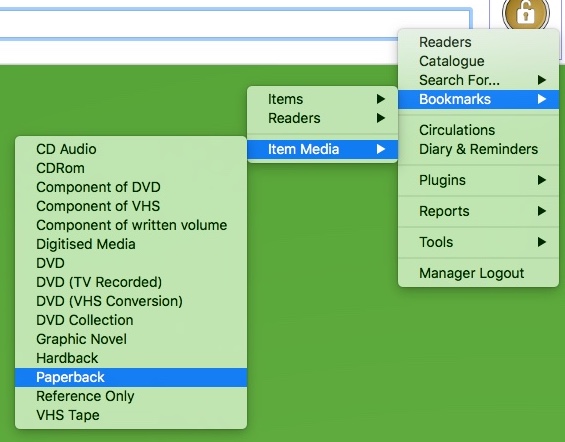
From this point on, a sub-menu is created in the [Bookmark & Lists] menu with the name of the group, containing all of the lookup values in that group. Selecting one of these values displays a Reader or Item Manager window filtered only for records that match this item. For example [Bookmarks] > [Item Media] > [Paperback] would display an Item Manager window only containing the paperback books in your catalogue.
The biggest disadvantage of using this method is that the entire contents of the group would be made into a sub-menu, regardless of how many lookup values are in the group. It is recommended to use this method only when the contents of the group is very small, and it is logical to select anything in the group.
Using Auto-List with individual values
 A far more controllable method of creating auto-lists is through the selection of individual values. Enter the Lookup Manager and open a group (e.g. [Item Media] with values that you would like to see on the auto-list menu. Select an individual value in the group (e.g. [Paperback]) and click the [Auto-List] checkbox, then select [Update] to save the change.
Using this method, it is possible to create smaller sub-menus which contain only those values which are of logical use for common selection.
Quickly creating auto-list values
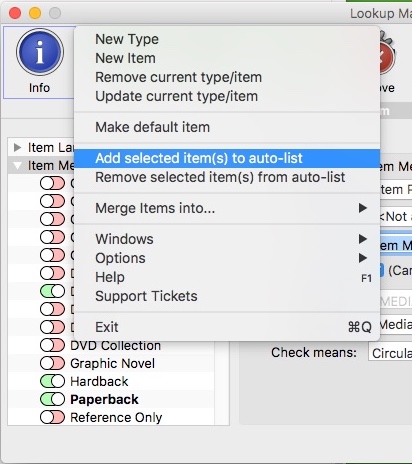 While it is possible to individually select a lookup value, then check the [Auto-list] checkbox and save the record, this might be time consuming in the building of larger lists. For this reason, an assist is provided in the [Info] menu.
In order to add or remove auto-list settings in bulk, open up any groups that you wish to include and click the switch to the left of the value to select them. You can select values in multiple groups at the same time, or concentrate on individual groups if you prefer. Once all of the values that you wish to include / exclude are selected (you can do this as many times as you wish - you do not need to do them all in one go), select either:
- [Info] > [Add selected item(s) to auto-list], or
- [Info] > [Remove selected item(s) from auto-list]
to add or remove the [auto-list] setting in-bulk.