This is an old revision of the document!
Table of Contents
Manually Updating Reader Groups
Why a manual update function?
If your organisation is large, it is usual yo update your reader groups using an export from a centralised administration system export - such as a data file produced by SIMS in a primary school. Using the import reader facilities, it is then possible to selectively just update the class / tutor group rather than modify the entire reader record.
Sometimes however, possibly influenced by personal preference or very small numbers, or even a gradual update that has been presented to you during the year, it may be more efficient to simply move small groups manually (or even the entire organisation, for that matter).
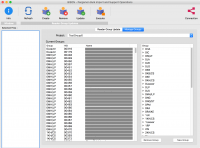
Manage Groups Layout
Project Selector
Updating your groups can be broken up into projects so that you do not need to update all of the readers at the same time, as well as being able to record reasons as to why certain updates are taking place. Before starting to record changes, you can select the appropriate project from this drop-down list.
Current Groups
The left hand side displays the current group allocations for each reader in your database. Initially this list is shown in group order, but you can reorder the list be clicking the header of any of the columns.
Projected Groups
The right hand list displays all of the current groups in an hierarchical form (open the group using the [>] symbol on a Mac or the [+] symbol on Windows), as well as any new groups that you create using the [New Group] button at the bottom of this section.
Group Update Procedure
Step 1: Select a Project
Either select a group from the Project drop-down list, or click the [Create] toolbar icon to create a new project. If you are creating a new one, use a description which is informative regarding the reasons for this update - such as 'New Academic Year 2018'.
Once selected, a list of all readers are displayed in the left hand list.
Step 2: Creating New Groups
If you need new groups, create them using the [New Group] button at the bottom of the page. It is important that your do not create them inside Pergamon at this stage, as new year groups may change before the year begins. Leave the management of these new groups to BISON.
Creating a new group here, creates the new group ONLY for use within this project, and they will not become a real, working group until you [Execute] the project (see below), which may be in several months time if you are preparing your changes far in advance.
Step 3: Moving Readers
Select or multi-select readers in the left hand list (you can use the standard multi-select key options of SHIFT and CTRL to allow you to select different ranges with the mouse-click - experiment to see how this works on your operating system).
Once you have some selected, drag-and-drop the readers across to the new group in the right hand list. If the group is closed, you may not immediately see the change here (simply open the group to see the readers moved), but at the same time they will disappear from the left-hand list.
Gradually, as you assign more and more new groups, you left-hand list will decrease in size.
If your readers groups are mainly moving up together, the entire class at a time, this may even be a faster process than waiting for an update file from administration.

