Table of Contents
Mystic Help
File Manager
As well as the main database, all users of Mystic also have an allocated area of the cloud server in which other files are stored.
Under normal circumstances, these files are directly maintained by the functional areas of Mystic (such as loading CSV and Excel files for BISON to import into the database). As well as loading them, these functional areas can be used to remove them when no longer in use.
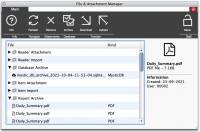
The Mystic [File & Attachment Manager] however, is provided to also perform direct management of these files, as well as perform one or two further operations which can only be be performed here in the manager.
Layout
On initial display, the main part of the [File & Attachment Manager] displays a typical tree-view listing similar in nature to a conventional folder (directory) browser. It lists the six different sub-directories that are automatically created within your file storage area:
- Database Archive - copies of your live database which can be archived for security and further download for local backups.
- Item Attachments - files that are attached to items in your catalogue, such as cover images, digitised samples of content etc.
- Item Import - files that are current in the BISON system for importing item data into the database, such as MARC files from book suppliers.
- Reader Attachments - files that are attached to readers in your readership, such as photographs, photographs of certificates and authorisations etc
- Reader Import - files that are current in the BISON system for importing reader data into the database
- Report Archive - PDF copies of reports that you have generated in the reports area, or which Mystic has generated automatically for you (e.g. daily summary reports).
Clicking a Folder opens the folder and displays the files stored within.
Clicking a File displays details of the file on the right hand side of the dialog.
Refreshing the Display
In order to refresh the display of files, click the [Refresh] toolbar button. Unlike other areas of Mystic however, the stored files rarely change at a fast pace and it is unlikely that a refresh will typically be required.
Removing a File
In order to remove a file, select the file in the display and then click the [Remove] toolbar button in the [Attachments] toolbar group.
Note that removing a file here bypasses the normal functionality of Mystic, and it may be that records to which the file is attached will be out of synchronisation. While this will not cause errors, it will mean that files which are initially indicated as being available to end readers (e.g. a book cover) can not be displayed.
It is typically better to remove files which are technically 'attachments' to Mystic records only using the functionality provided by the various specialised functional areas.
Archiving the Database
In order to make a file copy of the current Mystic database for your account, click the [Archive] button in the [Database] toolbar group.
This function makes a server based copy of the secure database in the Database Archive folder of your account. The file server and the database server are located on different physical hosts, maintained by different providers and in different physical locations, and this process therefore provides a good physical backup option.
Note that this file is intended only for disaster recovery purposes (Esferico and the database server hosting provider also make their own secure backups of all data) and remains in a heavily encrypted state, accessible only by Mystic tools. It cannot be opened using typical end-user database query tools.
If you also wish to make a local copy of the database file, see the download functionality below.
File Transfer
All files that are managed by the [File & Attachment Manager] dialog reside on the cloud server that you are connected to. This means that you need to be able to transfer files between your local workstation and the file storage area of the server.
Uploading Files
In order to upload a file, select the Folder that you want to place the file in then select [Upload]. This will trigger the standard file upload tool allowing you to select a file and start the upload process.
Note: At this time, there is no functionality within Mystic that requires directly uploaded files. This facility within the File & Attachment Manager is therefore disabled - please use the upload facilities within the specific functional areas, such as the BISON import dialogs.
Downloading Files
Downloading files permits you to make copies of files that have been attached to records using the specific functional areas (such as reader and item images), as well as downloading backup copies of files created by Mystic itself, such as report PDFs and Database Archives.
In order to download a file, select the file in the list of folders to display its details.
Click the [Download] toolbar icon in the [Transfer] toolbar group to trigger the download. Download file transfers are performed in conjunction with your browser. The browser will therefore decide where to place the file after download, and if sizeable will also provide you with status information regarding how complete the transfer is.
Typically, there will be an allocated folder on your workstation where your browser will place the downloaded file (e.g. a Downloads folder in your personal account area). Once downloaded, transfer the file to its final intended location.

