
This is an old revision of the document!
Table of Contents
Adding Emphasis and Other Formatting
 The LostPlot Writer dialog is based upon the MarkDown and Fountain mark up formats, along with one or two custom tags unique to LostPlot. This system ensures that a degree of emphasis can be added to the raw text of the Content and yet still be fully readable, while at the same time providing instructions for later formatting within the styles Document pane.
Formatting instructions come in three types:
- Codes that appear by themselves on a line.
- Codes that prefix a line and affect the whole of the remaining line.
- Codes that 'wrap' a word or phrase, in-line
While you can start to add emphasis and other formatting using the Writer menu system, as these tags are conventional text you will probably find that you start to type them manually as a normal part of your authoring process, if you require them.
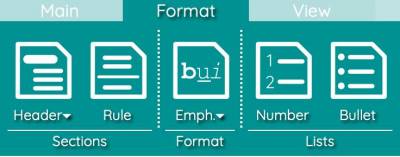
Headers
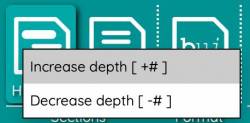 To mark a line as a section header, place your cursor somewhere within the required line or paragraph then select one of the menu options under the [Header] toolbar icon on the [Format] toolbar tab. Header lines are indicated by the number of 'hash' [#] symbols that appear to the left of the line, separated from the text by a single space. The tag needs only to appear on one side of the formatted text.
- No hash indicates conventional body text.
- A single hash describes the very top most header style.
- Each additional hash moves the header further down the chain of sizes (# top level header, ## sub-header) etc.
- By default, the sectional divider defined in the project placeholders utilises the level three header format (###), but this can be modified in the project configuration dialog.
Horizontal Rule
 As an alternative to the section divider used between paragraph sections, you can add a full page width horizontal rule using the [Rule] toolbar icon in the [Format] toolbar tab.
The horizontal rule formatting tag is represented by the hyphen symbols (—) residing on a line of their own, and both prefixed and suffixed by a blank line.
Emphasis and Reference Tags
 The [Emphasis] toolbar icon in the [Format] toolbar tab is used to wrap selected text with tags which in the case of Emphasis modifies the way that the text is styled in the final Document, and in the case or Reference tags makes no change to styling but provides internal linkage to alternate text and background information.
Note that all Emphasis characters in LostPlot utilises the customised LostPlot tags and not the standard/extended MarkDown set. This has been done to standardise the form and nature of the tags, as well as removing duplication. If you wish to use the code MarkDown emphasis tags, change the project configuration.
Emphasis
To emphasise text, select the text with the mouse or keyboard then click the required emphasis in the drop-down menu. Seven typical emphasis types are currently supported by LostPlot:
- Bold - text is wrapped in double asterisk characters [ * * ]
- Underline - text is wrapped in double underscore characters [ _ _ ]
- Italic - text is wrapped in double forward-slash characters [ / / ]
Strikethrough- text is wrapped in double-hyphen characters [ ~ ~ ]Monospaced Text- (also known as 'code') text is wrapped in double reverse-ticks (gravs) [``]- Superscript - text is wrapped in double-plus characters [ + + ]
- Subscript - text is wrapped in double-minus characters [ - - ]
Note: To show characters in this document, spaces are often added to prevent the MarkDown interpreter of the Wiki from processing them. In the case of using these tags manually in LostPlot, do not include any spaces within the tags.
Note: When selecting text with the keyboard, hold down SHIFT then use the cursors to move to another location. It is usually easier to simply use the mouse however, if you are going to then select a menu option.
Referencing Tags
Referencing tags are added to selected text in the same way as normal emphasis - select the text using the mouse, then click the required reference tag from the [Emphasis] toolbar icon.
There are two types of referencing tags available:
- Placeholder Tags
- Resource Tags
Placeholders
Placeholders wrap selected text in double-curled braces in the form { {name} } and represent direct replacements for text that has been defined within the project configuration. Adding the placeholder { {author} } into the Content of an Index Card for example, will result in the actual author's name being embedded into the final styled document in the Document pane.
Using the placeholder system in this manner is more convention than requirement for some types of placeholder (such as for { {author} }, { {title} } etc.), but becomes far more useful when a word or phrase may need to (or is even possibly likely to) change at some point during the development process. By using a placeholder (for example the section divider placeholder), the word or phrase need only be modified in the project configuration for it to be changed in practice across the entire document.
Resources
In nearly all respects, Resource tags act and produce final Document pane text in exactly the same manner as conventional Placeholder tags. Their main benefit comes from internal use within LostPlot in regards to referencing and giving access to background information and research.
Resource tags wrap selected text in a curled-brace and vertical-bar combination in the form { |name| }.
For the majority of resource tags, simply place the name of the resource within the tags as normal and enter the final text in the resource record (see Managing Resources). For projects with non-overlapping resources (e.g. only one character called 'John'), the use of the tag is conventional. There are two forms in which the resource tag can be used which allows more control over what is replaced when the Document pane is styled:
- { |name| } - the conventional use. The text { |john| } is replaced with the normal title of the 'john' resource (e.g. 'John').
- { |name:keyword| } - used when an alternate text should be used in the Document styling other than the normal title of the resource. Within the resource manager, alternates are created in a keyword=text manner. Usually this is done as a result of a one-off requirement based upon the circumstances of the text being written (e.g. { |john:first| } may replace the text with 'Maj. Johnathon Rice' rather than the normal 'John'.
Note: If you have multiple characters with the same name that you want to use as a resource placeholders simply add a short suffix to make them unique. For example, { |JohnP| } and { |JohnR| } could therefore both simply have 'John' as their replacement text (if not exactly advisable from a storytelling perspective…)
It should also be noted that LostPlot is not advising that authors should utilise the Resource tagging system for every occasion that a resource (character, event, place etc.) is used in the text. The most conventional method of using the Resource tag system is to place the 1st occurrence of a resource in an Index Card into a tagged reference so that the author can bring up the details of the resource for reference when required.
Links and Images
The most complex MarkDown tags that LostPlot supports from the menu are the hyperlinks and images. These two tags involve two, or possibly even three set of tags embedded within each other but luckily are not used very commonly within the body text of a document. Usually when used, they have a special purpose in certain situations only.
Hyperlinks
The most common use use of Hyperlinks is in the linking of references to sources on the internet - not just within the final document such as in a reference or appendix, but also within the summary for author reference during development.
Hyperlinks are embedded in the text in two parts separated by square and conventional braces:
[Text to appear in the document](hyperlink to the document)
- The text within the square-braces (which must always comes first) is displayed within the document in the style usually connected with a hyperlink. This may vary according to the web browser in use, but is usually blue and underlined.
- The text within the normal braces (which must always come last) is hidden from the reader, and represents the link to the destination web resource.
The following example therefore, would result in a clickable link to the Esferico ltd. website:
[Esferico Website](https://www.esferico.net)
Images
Strip Emphasis
The [Strip Emphasis] menu option is used to remove all emphasis tags from selected text. This option is useful to reset a section of text to a known base level before reapplying emphasis a second time.