Table of Contents
Fixed Width Files
On selection of the [Load All] toolbar button, BISON will load the first file in the list and display the Data Process Window (see below).
This window is designed to allow you to tell BISON how you want the file format interpretted, or to simply select one of the presets (for example, a preset is available to deal with files originally produced for Esferico's SIMS Importer utility).
If you find that this file is a fixed-width file, where each row and field takes up the same spacing on the page, with each field buffered out by additional white-space, you will need to place the text processor into [Fixed Width] mode by selecting the appropriate tab at the top of the page. If you are used to the Delimited Text Processor options, you will see that there are a few changes that occur to allow you to tell BISON how to deal with the file.
Data Processor Layout
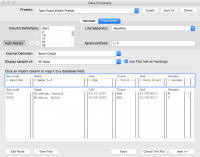 There are three options that you need to select to tell BISON how to interpret the general layout of the file. The [Internal Delimiter] is only required if you have several pieces of data within the same field, separated by a known character (e.g. 'Red; Green; Blue'). This is usually only required for Catalogue Items however, and rarely for readers.
More importantly, there is the [Line Separator] which is the equivalent to the [Row Separator] on the Delimited page. Setting this option will tell BISON how to break up the lines of the files into separate records - this may vary according to where the file came from, especially is a different operating system.
The bulk of the changes lie within the top area of options where we can tell BISON how to chop up each line of a record and ignore rows that are really just window-dressing (vital, if the page was intended for printing on paper, where dividing lines, titles and page numbers may have been present).
The bottom of the window shows the various functions that you can perform once you have configured your data. We will look at these functions below.
Step 1 - Selecting a Preset
 If you know that the data file being imported is a standard file that follows one of the presets (or indeed, you have done this already, and have saved a preset from your earlier work), simply select this from the list and proceed to [Step 3], below.
Even if you know the preset for this file, it may be prudent to view the file prior to importing, just to ensure that all of the records are importing as expected.
If your data does not match a preset, proceed to [Step 2] to configure your import manually.
Step 2 - Configuring the Importer
Select a Line Separator
Fixed width files tend to use a single text line in the file to represent each individual record, but different operating systems utilise different line-termination characters (e.g. Windows vs. MacOS).
If the file utilises a custom-character to represent the end of a record, select [Custom Character] from the drop-down menu and either type the character into the box provided (if available on the keyboard) or as a numeric value (requires you to tick the 'Asc #' box).
Select to Ignore Prefixes
 Especially in Fixed-Width files that were intended for printing, there will be lines that are totally unimportant and just contain decoration and general layout. We can tell BISON to ignore these lines by entering a few unique characters representing those lines. If we need to 'ignore' multiple lines, enter each ignore prefix separated by a semi-colon.
For example, a report intended for a dot-matrix printer may use a line like +———-+ to break up sections. To ignore this line, we could probably just enter +; as most other lines would not begin with this character, or +-; to make it more unique as a normal data line would probably have a space after the plus-symbol before the start of a field.
Display Sample
Imported data files may contain many thousands of records. For sample display purposes (so that you can see how the real-time changes to your settings are affecting the data), we default to only the first 50 lines.
Use the drop-down menu to select a different sample, or even [All] to see the full final result.
Use First Row as Headings
Many text files use the first record in the file to represent the field names, or Headings, or each column.
If the first line of your file is clearly headings ensure that this tickpbox is turned on (default) - otherwise, the first line will be used as a valid record, and imported with the rest of the data.
You may find that a header line is not immediately obvious - this may be because the header is actually buried beneath page layout and decoration. If this is the case, make sure you add appropriate 'ignore prefixes' to allow BISON to remove these lines from the display.
Step 2 - Defining Columns
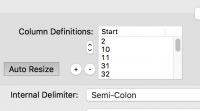 Once we have broken down the file into lines correctly, and told BISON how to ignore lines that we do not want, we need to split each individual line into the separate fields. Unfortunately, unlike a delimited file, these field widths may all be different and it will need to some human intervention to configure them.
At the start, only a single column start-point is defined - as a result, each line is regarded as one long column (another name for 'field' of data). In order to split this single column up, we need to perform the following recursive procedure until we have all of the columns defined.
General Process
Click the [+] symbol to add a new column to the list. BISON does this by reducing the last column defined by 1 character and create a new 1-character wide field on the end.
Use the [up]-[down] control at the side of the column definitions to move the start point of this new column (click the column in either list to select it - if you do not have a column manually selected, BISON will assume you mean the first column).
Typically, after creating a new column use the [down] button to draw in the column start-point from the end of the line so that the difference between the two column-start points describes the field of data you want.
Repeat the process (add a column start point, draw it in to the end of the last field) until you have defined all of the fields that you want.
Dealing with 'vertical' page decoration
While we removed horizontal page decoration by adding 'ignore prefixes', we can not do this for vertical lines as they are embedded with the individual records.
If vertical lines do exist in your data, create a single character wide column to separate them from your true data - do not leave them within a data column or they will be imported into your database!.
Step 3 - Finalising Your Configuration
Mapping Data to Pergamon Fields
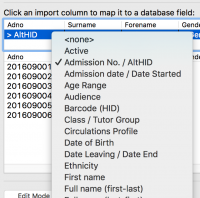 It is extremely rare for the headings of data in your import file to match the actual fields in Pergamon (e.g. AdNo from SIMS is AltHID in Pergamon). As a result, and only after we know how the fields are laid out, we need to 'map' each field to tell BISON where to put the data.
Above the sample data can be found the 'Mapping Strip' containing each of the column names and what the column is mapped to - at the start, these will all read <none>.
To map a column, click the <none> value with your mouse to display a list of possible Pergamon fields to receive this data. Select a field, then progress through each column in turn until each field has a destination selected. If you do not want to import a particular column, just leave the selection as <none> and BISON will ignore that column of data.
Remember that if you have isolated vertical line page-decoration into separate columns, ensure that you leave these columns assigned to <none> so that they are not imported!
If you have selected a preset, all of this mapping will be done for you.
Step 4 - Processing Your Data
Once your have configured the data import so that the sample fields appear to be being processed in correct way (the individual records are on separate lines, each field is correctly in a different column etc.) we can start to process the data itself. Up until this point, we have simply being teaching BISON how to load the data from the file. Now we must tell BISON what to do with the data.
From this point on, the process is identical to that employed to import the delimited files.
The line of buttons along the base of the window, provide us with several processing and utility functions.
Edit Mode
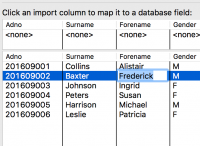 The [Edit Mode] button allows us to edit the data that is displayed in the on-screen spreadsheet and should therefore only be done as the final action before loading the data. All of the data is loaded into the spreadsheet, and individual cells can be edited by clicking the field with the mouse.
This utility is provided only to make minor changes to data which is clearly incorrect or might cause problems with the import - it changes the data only within the on-screen spreadsheet (not the file) and the changes are therefore not permanent. They will only remain if the data is processed and loaded into the Pergamon database.
View Final
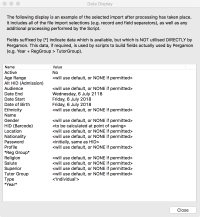 Use the View Final button to view a selected record in the form that it will be eventually saved into the Pergamon database, with any processing and changes applied.
Note that some values displayed may be listed in an abstract fashion such as <to be calculated at point of saving>.
Abort
The [Abort]> button cancels the process of this and all other files in the [Load All] queue.
==== Cancel This File The [Cancel This File]> button cancels the process of this file only, but proceeds to the next file in the [Load All] queue. ==== Next » ==== The [Next »]** button uses the current configuration and any changes that have been made to the database to process the data in the spreadsheet, saving each record into BISON's import buffer.
While not actual 'live' yet, the data is loaded into BISON ready for the next step in the import.
