Table of Contents
Mystic Help
Catalogue Manager
 The Catalogue Manager is the main location used by suitably authorised staff users to maintain the various catalogues within the library.
The main access point for the Catalogue Manager is the [Items] toolbar icon within the [Quick Access] toolbar group (if enabled) on the Workspace, or using the [Items] menu option accessible from the [Staff Menu] drop-down menu to the far right of the toolbar.
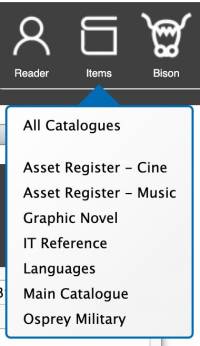
If the basic mode of Mystic is in use, selecting this toolbar icon immediately displays a Catalogue Manager dialog window. If the advanced mode is enabled, selecting this toolbar icon displays a drop-down menu containing the various [Catalogue Subject Areas] to which items have been assigned, allowing a staff user to access only a sub-selection of the overall catalogue.
It should be noted that the [Catalogue Manager] is a multiple instance dialog. In other words, the [Items] toolbar icon can be selected multiple times, with a new [Catalogue Manager] dialog being displayed on each occasion. It is possible to have multiple catalogue manager dialogs, each containing a different filtered item list, open on screen together.
Layout
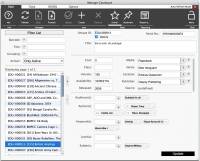
The [Catalogue Manager] is typical of a standard Mystic manager dialog layout. On the left-hand side of the dialog is a drop-down pick-list containing all or a filtered sub-section of all records available for editing. This is is headed by a filtering mechanism consisting of (at time of writing) four different filtering types, selectable from the top drop-down pick-list:
- Basic - The basic filtering option mimics the standard filtering option of the catalogue manager pre-v1.5. This simple filtering option contains three possible filter fields: Accession Barcode, Title and Series as well as whether the item is active, inactive or either.
- Advanced - The Advanced filtering option mimics the environment provided by the standard staff level Search dialog, accessible from the Workspace [Search] toolbar icon. Using this filtering option, the staff user can specific far more and varied filtering options to narrow down the displayed list.
- Lists and Projects - The Lists and Projects option displays all of the Search Lists that have been created on the system, either through the standard [Search] dialog, or as result of the Integrity Check system. Selecting a list results in the items being filtered to only those items which dynamically appear in the selected List.
- Packages - The Packages option displays all of the Item Packages that have been created on the system, either through the standard Package Manager dialog available via the BISON toolbar menu, or as a result of the Integrity Check system. Selecting a package results in the items being filtered only to those items which were specifically attached to the Package. Removing an item from a package will also remove it from the list if displayed items.
 The right-hand side of the dialog displays the record details. The details initially remain inaccessible until a record is selected from the left-hand list. Once selected, the details can be accessed and edited. In a standard Catalogue Item details display, the right-hand area contains a number of sections, ordered vertically:
- Standard Details - The standard details section is non-scrolling and always appears at the top of the dialog. This section contains the Accession Barcode of the item, its serial number (for books, most usually the ISBN in either ISBN-10 or ISBN-13 format) and the Title of the item.
From here down, each section is within a scrolling panel, allowing each section to expand to accommodate more information:
- Basic Information - The basic information section contains single-field values (i.e. each item possesses only one version of each field). These fields are the: Cost, Class (an shelf indexing method, usually Dewey for books), the Volume Number if in a series, the Availability (the date it became available in the library), the Year Released or produced, its Media type (such as paperback for books, but can also refer to other applicable options such as camera lens, DVD etc.), any Series name to which it belongs (e.g. Harry Potter), it's general physical storage Location (such as simply Library or another room name), it's Publisher and its Source (origin of acquisition).
- Mystic Expanse Indexing Fields - The Mystic expanse represents an indexing system which allows an unlimited number of indexing values to be attached to an item, using the multi-value control. A standard library will normally have the first four Indexing Categories: Audience (the type of reader that the item is intended for), Contributors (or Authors, who contributed to the creation of the item, Keywords (representing words or phrases that a reader may use to find the item) and Levels (or reader levels, describing the reading level that the item is intended for). New categories can be added for advanced libraries, with some of the usual additions including: Subject area (allowing selection of Catalogue sub-sections), Vendors, Categories, Languages and Provenance.
- Abstract - The Abstract field allows a textual description of the item to be entered. In the case of books, this will most likely be the abstract provided by the publisher and printed on the exterior of the cover. This field is plain-text, but functions elsewhere in Mystic can interpret MarkDown information used to format the text, such as OPAC descriptions and reports.
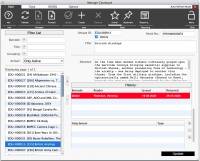
- History - The History section displays a circulations history of the item being displayed. If the [History] toggle is selected in the [Options] toolbar tab the history information is displayed immediately when the item is selected. In all other cases (to reduce the transport of unnecessary data for items with a long history in the catalogue), the list remains blank but can be populated manually by clicking the [History :] title bar above the list. Any circulation displayed on a red background indicates that the item was returned late.
- Attachments - The Attachments list shows all additional files that are attached to this item. This can include images (e.g. book covers), additional images, PDFs and text files describing the contents of the item etc.
Basic Use of the Catalogue Manager
The following paragraphs describe the most basic uses of the Catalogue Item Manager but it is capable of far more than this simplistic description. Use the additional links shown below to learn how to use the more advanced features.
Navigating the Catalogue
In most library environments, loading the Catalogue Item Manager automatically loads the item listing based upon the current Basic criteria - which on initial load if effectively all items. It is strongly advised to ensure that the [Paging] drop-down menu toolbar icon in the [Options] toolbar tab is set to as low a value as possible to increase the speed at which any single page of items is loaded into the list.
If the entire catalogue is loaded, a simple number will be displayed above the list stating how many items are present. If paged (the advised option), the label above the list will reader Displaying page n of m, stating which page you are currently on and the total number of pages available.
Use the [Back] and [Forward] toolbar icons in the [Main] toolbar tab to move back and forth between pages of items.
Creating a New Item
You can create a new item by clicking the [Create] toolbar icon. In the standard creation mode, a new item is created in the database and displayed (in isolation) in the list. At this time, the accession number is not known so is given a default accession number of <New…> incorporating the date on which it was created. If not automatically selected, click the record in the list to display its details ready for editing.
Note that you can optionally configure the Catalogue Item Manager to:
- Generate the next barcode - On Create the system will generate the next barcode number automatically and add it to the item rather than <New…>.
- Request a barcode before creation - If you have books that are already barcoded, this option allows you to click the Create button then type/scan the barcode off the book prior to the item being created in the database.
Simple Editing of an Existing Item
The simplest for of editing of an item is to select the item required from the left-hand list. The details of the item are displayed in the right-hand details fields.
Click the first field that you wish to edit, then type the new value (if it is a text field) or select an option if a drop-down etc.
While some users prefer to click each subsequent field with the mouse, it is far easier and less stressful on the hand to simply use the [TAB] key on the keyboard to move to the next logical field in turn.
Once all edits have been made, click the [Update] command button at the bottom of the dialog, or the [Update] toolbar icon to save the new details into the database.
Note that some data fields may require further knowledge to use, but once learned are very easy:
- Editing MarkDown - for the Abstract field. Note that this field is a normal plain text field, and this link simply provides information of MarkDown formatting, not use of the text field.
- Uploading a file - when adding attachments
- Editing a dynamic drop-down - for use with Media, Series, Publisher etc.
- Editing a Multi-Value Control - for use with Contributors, Keywords etc.
Removing an Existing Item
In order to remove an existing item from the catalogue, first find and select it from the left-hand list to display its details.
Confirm that this really is the item that you wish to remove, then click the [Remove]] toolbar icon. After confirmation, the item will either be:
- Removed From The Database - the item is permanently removed from the database.
- Deactivated, and moved to the Purge Bin - this is the default and recommended settings. The option can be changed in the catalogue options toolbar. Once placed into this situation, the item will not appear on OPAC searches and will not be found in circulations. Using this mode allows you a second chance of recovering the item.
Additional Catalogue Manager Features
The Catalogue Item Manager possesses a number of additional features which expand the ability of staff users in cataloging and maintaining items. These include:

