
Table of Contents
Importing Delimited Files
On selection of the [Load All] toolbar button, BISON will load the first file in the list - if the file is identified as a text type (such as .text, .csv, .tab etc.) it will display the Data Process Window (see below).
This window is designed to allow you to tell BISON how you want the file format interpretted, or to simply select one of the presets.
Data Processor Layout
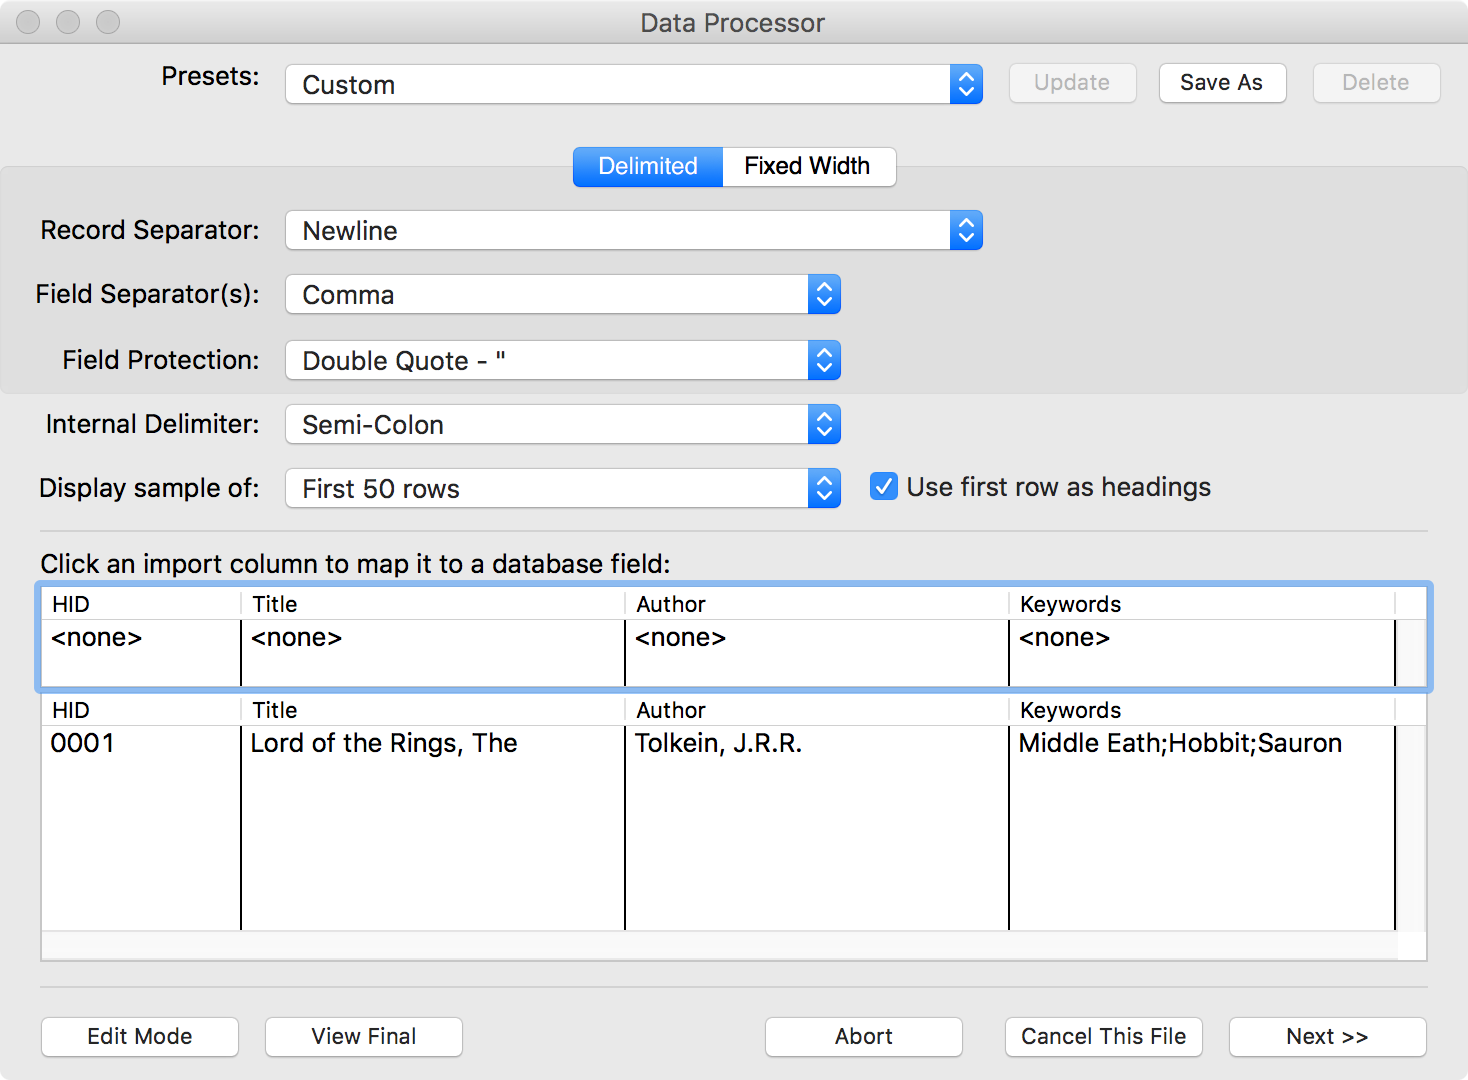 The top of the window contains a number of configuration options that are mainly selected by choosing an option from a drop-down menu.
Below this is a display sample of the file being imported, along with a band showing how the fields within this file will be mapped to Pergamon fields within the database. As you change configuration options, the appearance of this sample data area will change dynamically to show how your changes are taking effect.
The bottom of the window shows the various functions that you can perform once you have configured your data. We will look at these functions below.
Step 1 - Selecting a Preset
 If you know that the data file being imported is a standard file that follows one of the presets, simply select this from the list and proceed to [Step 3], below.
Even if you know the preset for this file, it may be prudent to view the file prior to importing, just to ensure that all of the records are importing as expected.
If your data does not match a preset, proceed to [Step 2] to configure your import manually.
Step 2 - Configuring the Importer
Select a Record Separator
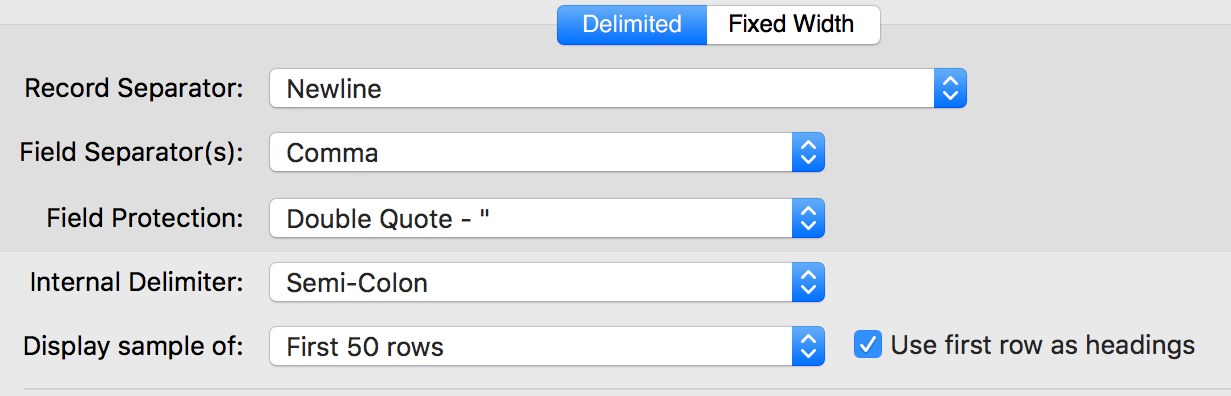 If your data file is a delimited format (such as CSV or TSV) this should be a simple task of selecting Carriage-Return, Newline, or combinations of them from the drop-down menu.
Delimited files tend to use a single text line in the file to represent each individual record, but different operating systems utilise different line-termination characters (e.g. Windows vs. MacOS).
If the file utilises a custom-character to represent the end of a record, select [Custom Character] from the drop-down menu and either type the character into the box provided (if available on the keyboard) or as a numeric value (requires you to tick the 'Asc #' box).
While extremely rare, some files are still produced that require the [Fixed Width] select. This is most common if the text file has been produced as a fixed-text report intended for a printer, or the text has been scanned from a printed report. If selecting this option, enter the total record length (in characters) in the box provided. Selecting a Fixed-Width file will disable the Field Separator selector (below) and enable the fixed-width selection utility.
Select a Field Separator
Select the character that separates each individual field within a record. For CSV files, this will be a comma. For TSV, and some other Text files, this will be a Tab.
Several other common separator options are also provided, or enter a [Custom Character] if required, in the same way as above.
Select a Field Protector
Data very often contains characters that are also used in the file format - for example, in a CSV (Comma Separated Values) file, we use a comma to separate fields and so encountering a comma within the data causes extreme problems in processing the file.
Many formats therefore use a Field Protector character - any special character within the field protectors is therefore ignored as a special formating character. For CSV files, this is commonly a double-quote character (e.g. “This comma, is protected”).
Select the most appropriate field protector from the drop-down menu for your import file, or a custom character in the same way as above. It will be obvious when you select the correct character, as highly repeatable occurrences of the character(s) will disappear from before and after the sample data being displayed.
Select an Internal Field Separator
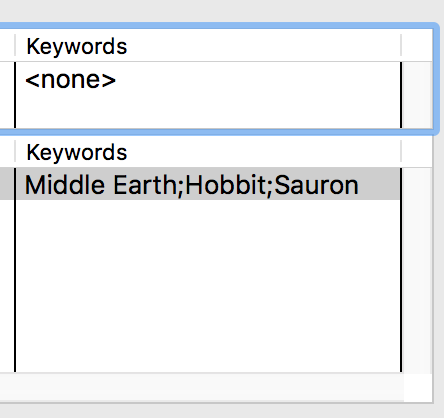 Select the character that separates each individual component of data within a field. This can vary greatly. In the keyword example “Middle Earth;Hobbit;Sauron”, the internal field separator would be the semi-colon (';') to identify each individual keyword.
Several other common separator options are also provided, or enter a [Custom Character] if required, in the same way as above.
Display Sample
Imported data files may contain many thousands of records. For sample display purposes (so that you can see how the real-time changes to your settings are affecting the data), we default to only the first 50 lines.
Use the drop-down menu to select a different sample, or even [All] to see the full final result.
Use First Row as Headings
Many text files use the first record in the file to represent the field names, or Headings, or each column.
If the first line of your file is clearly headings ensure that this tickpbox is turned on (default) - otherwise, the first line will be used as a valid record, and imported with the rest of the data.
Mapping Data to Pergamon Fields
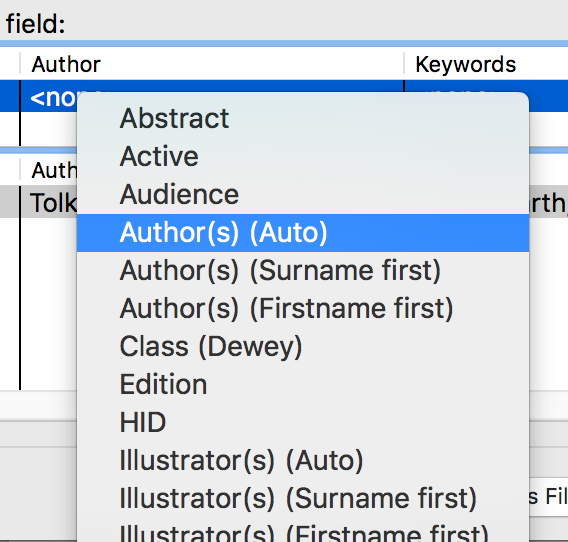 It is extremely rare for the headings of data in your import file to match the actual fields in Pergamon (e.g. ISBN from a book catalogue is Serial No. in Pergamon, as we use the same field to store ISBN, ISSN or even hardware serial numbers). As a result, we need to 'map' each field to tell BISON where to put the data.
Above the sample data can be found the 'Mapping Strip' containing each of the column names and what the column is mapped to - at the start, these will all read <none>.
To map a column, click the <none> value with your mouse to display a list of possible Pergamon fields to receive this data. Select a field, then progress through each column in turn until each field has a destination selected. If you do not want to import a particular column, just leave the selection as <none> and BISON will ignore that column of data.
If you have selected a preset, all of this mapping will be done for you.
Step 3 - Processing Your Data
Once your have configured the data import so that the sample fields appear to be being processed in the correct way (the individual records are on separate lines, each field is correctly in a different column etc.) we can start to process the data itself. Up until this point, we have simply being teaching BISON how to load the data from the file. Now we must tell BISON what to do with the data.
The line of buttons along the base of the window, provide us with several processing and utility functions.
Edit Mode
The [Edit Mode] button allows us to edit the data that is displayed in the on-screen spreadsheet and should therefore only be done as the final action before loading the data. All of the data is loaded into the spreadsheet, and individual cells can be edited by clicking the field with the mouse.
This utility is provided only to make minor changes to data which is clearly incorrect or might cause problems with the import - it changes the data only within the on-screen spreadsheet (not the file) and the changes are therefore not permanent. They will only remain if the data is processed and loaded into the Pergamon database.
View Final
Use the View Final button to view a selected record in the form that it will be eventually saved into the Pergamon database, with any processing and changes applied.
Note that some values displayed may be listed in an abstract fashion such as <to be calculated at point of saving>.
Abort
The [Abort] button cancels the process of this and all other files in the [Load All] queue.
Cancel This File
The [Cancel This File]> button cancels the process of this file only, but proceeds to the next file in the [Load All] queue.
Next >>
The [Next »] button uses the current configuration and any changes that have been made to the database to process the data in the spreadsheet, saving each record into BISON's import buffer.
While not actual 'live' yet, the data is loaded into BISON ready for the next step in the import.